Project
Projecttitel: VS-1
Status: IN PLANNING
Startdate: 06/2020
Duedate: 04/2024
Updated: 25.Jan.2024
Manufacture link: http://abstraktinstruments.com
https://abstraktinstruments.com/vs1-diy/
Facebook group: (I´m the admin). https://www.facebook.com/groups/849435342474238
send me a message if you dont get access
Modwiggler Build thread:
This Pages are only especially for the DIY Version
The Kickstarter campaign is online since: 14.Jan.2020 and was sucessfully backed with 250K USD
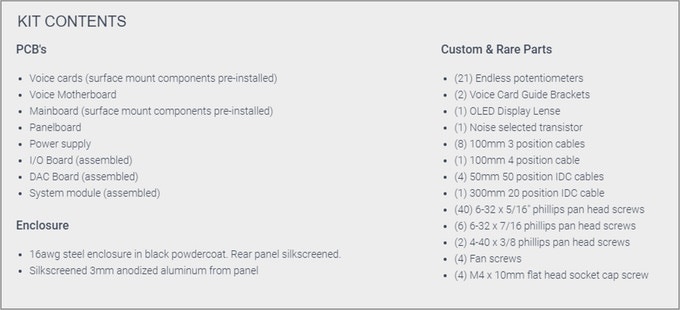
DIY PCB Set:
Stretchgoals:
- 120K - MPE Support
- 140K - Direct Outputs
- 160K - Stereo Analog Chorus - We have a hell of an analog chorus designed - we can't add cost & commit resources to implement it unless we reach certain cost targets.
- 180K SD Card
- all Stretch Goals arrived
BOM:
VS-1_DIY_BOM(v102).xlsx from 04.Jan.2024
VS-1_DIY_BOM(v103).xlsx from 24.Jan.2024
this is the old BOM and should help people to find some parts, this isn't the full BOM !!
Schematics: (copy from Jan.2024)
Build it:
Please see the Altium 365 Viewer documentation for full details on the cloud-based tool.
Mainboard
Voice Motherboard
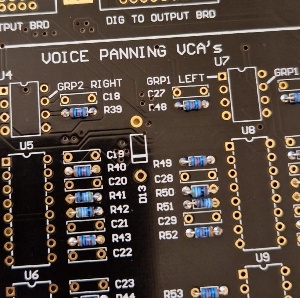
Voice Card
Output Board
Panelboard
DAC Board
I/O Board
furthermore watch all YT videos on Brians Channel:
https://www.youtube.com/@abstraktinstruments8666
Issues/Failures/Improvements
| ID | Date | Bug/Issue/Improvement | affected part/pcb | Issue | Fix | reported by | reported to developer | affected version | fixed pcb version |
|---|---|---|---|---|---|---|---|---|---|
| 1 | Jan 2024 | Silkscreen wrong | Voice Motherboard | diode wrong silksvcreen orientation D13
| install against silkscreen | modwiggler user | no | diy | |
| 2 | 25.Jan 2024 | info | PSU | check that your PSU is still modified with other regulators my psu was still modified with the correct parts | just a visible check and keep in mind to test the psu later without attached Device/pcbs | Patrick | diy | ||
| 3 | 25.Jan 2024 | build info | Voice and Voice Motherboard | you have to respect that the MOLEX connectors on the Voice Motherboard and Voices have to installed in one step. You cannot start with soldering the molex connectors at the pcb without align it against the opposite part. do this: option 1:
option 2: a. insert in voice 1 the molex connector and solder only one middle pin per connector, correct the alignment If required b. insert in the connector the connector which is required for the voice mobo. c. put the voice to slot 1 and solder it - one pin per connector d. check, align and solder more pins |
Pictures from kickstarter (link)


