...
Instructions for Flashing
• Connect STM LINK to the Motherboard with the ribbon cable from the programmer and connect the STlink programmer with your Mac or PC
• Turn ISENIN on
• Open STM Cube Programmer Programmer or ST LINK utility (cube programmer is the latest software, but STlink utility is fine too and often better)
• Select ST-Link, select connect (which reads the ISE-NIN uC memory)
• Select erasing and programming button (in STlink utility its "program & verify)
• Browse select ISENIN 1.0b-1 Start programming!! Disconnect the programmer and restart the ISE-nin.hex file from your pc/Mac. - Start programming ***
• Repeat the procedure described above and select ISENIN 1.0b-2.hex Start programming as before (program and verify)
***you don't need to restart the ISE-NIN after first programming step, in case the ST-LINK tool hangs, just reconnect the USB cable.
• Disconnect and restart ISE-NIN – its important to remove the Programmer from the ribbon cable - or the device will not start !!
...
Calibration
Instructions for Calibrating
...
| Panel | ||
|---|---|---|
| ||
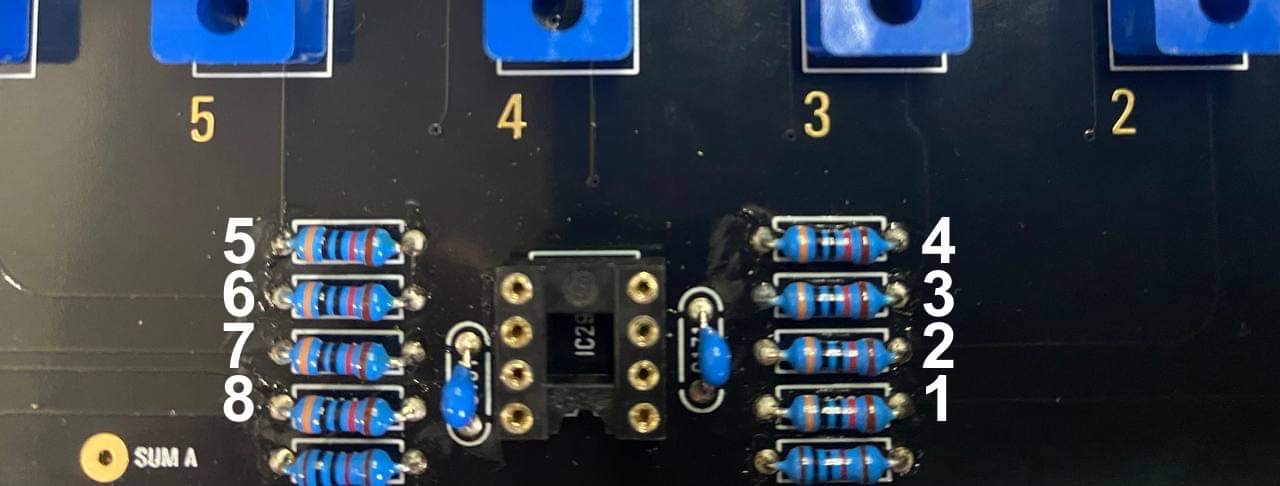
Here is a step by step guide to calibrate the filter resonance: (ONLY AFTER that you need to calibrate filters in further step)It´s recommend turning the resonance trimmer TR1 fully clockwise on each voicecard to make this procedure as easy as possible! The best way is to use 8 resistors on the mainboard for making a measurement. 1. Warm up your unit about 30-40 mins 2. turn on ISE-NIN, Go to menu (press shift (grey cap button) + Back (middle button under the display), then calibration, choose resonance (The display should read: "card 1" and you should hear a test tone through the outputs (for the next voice card you can press the "next (Back)" button to cycle through the voice cards) 3. Connect a Scope probe on the Mainboard, to the resistor of the card which you calibrate , set your oscilloscope to "timebase 0.5ms/cm" and "1V/cm" (on DMM: 0.5V -1V is fine too, depends on your scope screen resolution - some new scopes are HD resolution in 720p or more and the ADC are very accurat) 4. You should see the filter signal on your scope. If you have turned the trimmer fully clockwise the signal should be- and sound distorted. now turn the "resonance" trimmer TR1 on the Voicecard anti- clockwise until you get a clean signal as in the picture below (The difference of maximum and minimum amplitude in one cycle has to be 4-times.) make sure to have enough gain otherwise the Filter calibration step will fail as described in next section. Comment from Black Corp: "We especially made all settings in resonanse calibration how they should be (square, cutoff, 12db etc)." Congratulations, you have successfilly calibrated the filter resonance for all of the voices! Resonance calibration Method according to the Roland Jupiter-8 service manual (not recommended yet → use above method!!!):Go into MENU, CALIBRATION, RESONANCE. Follow these steps from the Jupiter 8 manual, turning Trim1 for each voice (or see below): Workaround or turn Trim TR1 until the self oscillation is off on each voice. you can switch between the cards using the switch button on the mother board. |
...

